Basic Definitions
In this article we will try to explain, in simple words, how we maintain our balance when standing and walking when using an artificial limb. To start with we will look at the basic physics and bio-mechanics behind posture and walking as well how this is affected by prosthetic alignment.
This article looks at alignment principles only, it is strongly recommended to speak with your own prosthetist regarding adjustments to your personal alignment.
Before we start, there are some terms and concepts to keep in mind when thinking about alignment.
Gravity – is a natural phenomenon by which all things are brought towards one another. In our case we need to remember that our bodies are constantly being drawn towards the earth.
Center of gravity (CG) – is the average location of the weight of an object. In our case, when we are standing still this point is in front of our spine just below the belly button.
Line of gravity (LG) – is a vertical line passing through the center of gravity
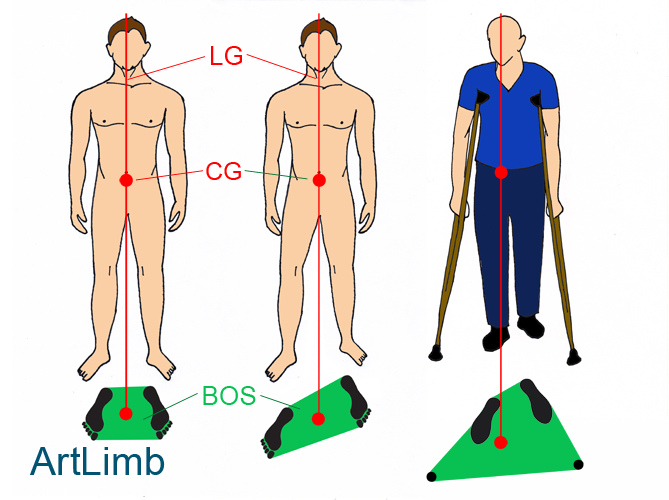
Base of support (BOS) – is quite simply the area beneath a person that includes every point in contact with the ground.
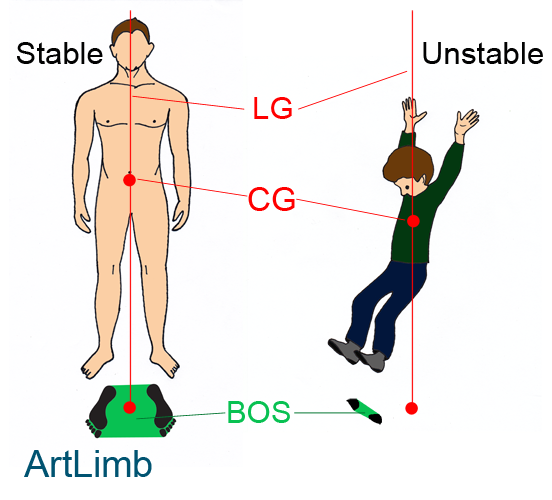
The picture above demonstrates the base of support (BOS) depicted in green. It is shown that the size of this green area changes with different postures and walking aids. It is visible that straddled legs and walking aids enlarge the BOS and help us remain stable. When the line of gravity is within the BOS, a person is said to be stable. When the line of gravity falls outside the BOS, the person is said to be unstable.
The picture above demonstrates a stable and an unstable body position. The unstable person’s line of gravity (LG) falls outside of his base of support (BOS).
Balance is the ability to maintain the line of gravity through the center of gravity within the base of support. To do this we have to use lots of different muscles to maintain a vertical position.
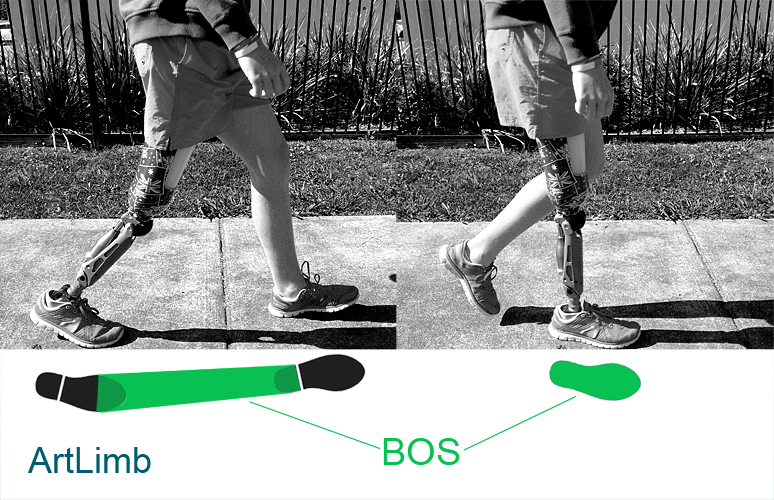
When walking, our base of support (BOS) and center of gravity (CG) are constantly changing. To accomodate for this and remain balanced, our body is continuously working to keep its line of gravity (LG) within the base of support. Our explanation is quite simplified, but describes the process in general.
The photo above demonstrates how the base of support (BOS) dynamically changes.
Alignment is the relative position of different parts to each other. This can be between different body parts or between different components of a prosthesis.
Naturally our bodies have their own individual alignment that is unique to each of us. This position allows us to stand and walk using the least amount of effort and without loosing balance.
Sometimes the bodies natural alignment can require correction due to poor posture, etc. Medical professionals can assess and advise you on how to solve existing problems.
When a prosthesis is involved, it must maintain the bodies natural alignment. If the prosthesis is not correctly alined, the body has to accommodate for this artificial position. This can put unnecessary stress on muscles and joints, making it harder to walk and can lead to complications.
The Alignment Process
There are several differing methods of aligning a prosthetic limb. The method we will explain involves four stages; stump position, bench alignment, static alignment and dynamic alignment.
Stump position
In our understanding, all prosthetics should start from the body. The first aim is to find the natural position of the stump when standing. To find this position, prosthetists can use a standing frame that allows free movement of the stump whilst under load. By using a frame, errors that could be introduced by prosthetic components are removed (artificial alignment).
During this stage, two reference lines are marked on the socket representing your bodies natural alignment from the front and the side.
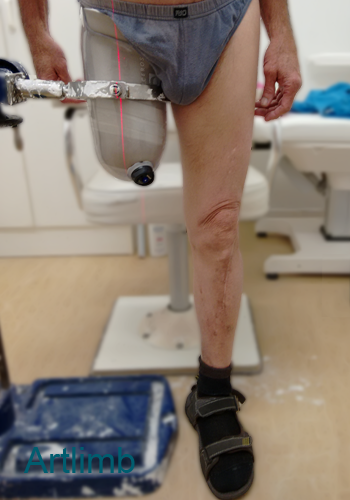
The photo above demonstrates an example of a standing frame used to find the individual alignment reference line. It is visible that the rings supporting the check socket can freely rotate, allowing the stump to find it’s natural position.
A visible red laser is used as a landmark to draw a reference line on the socket.
Note: The red line depicted in the above photo is given only for demonstration and might not reflect the individuals alignment line.
Bench alignment
With these reference lines marked on the socket, the prosthetic leg can be assembled.
All prosthetic components have a manufacturers recommendation for where the alignment reference line should pass through.
By following these recommendations the prosthesis will have a safe starting position from which individual tuning can begin.
Static alignment
Now that we have an assembled prosthesis with its initial alignment, it is time to make sure you can stand and balance on it.
Adjustments to alignment can be easily made at this time to make sure you are standing comfortably and able to naturally control the leg with minimal effort.
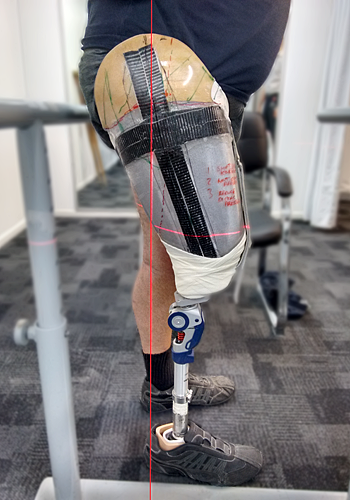
The photo above demonstrates an example of static alignment. This photo also depicts a pretty common situation when a rigid contracture of the hip joint was not taken into account during bench alignment. It is visible that the red alignment line is to far behind the knee and foot. Although the patient can stand on the prosthesis, it takes a lot of effort to maintain balance and an upright posture. It is visible that to compensate, the patient had to move his prosthetic foot and lean his body forward to partially relieve his overstressed stump and spinal column.
During the static alignment stage this error was found and corrected.
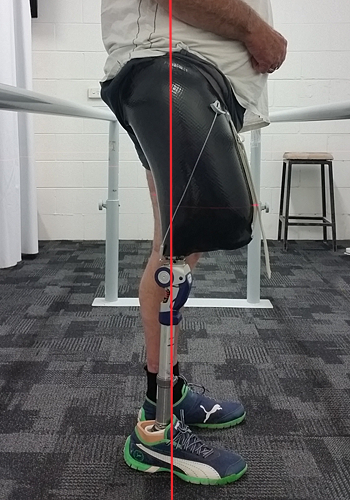
The photo above demonstrates the same patient with a prosthesis that takes into account the bodies individual alignment. Although the socket looks like it is in an odd position, it accommodates for his hip contracture. The amputee can stand balanced with a more relaxed posture allowing him to progress to the final dynamic alignment stage.
It is visible that the position of the red alignment lines on both photos are different.
Dynamic alignment
If there are no difficulties with standing balance, we will further tune your prosthetic leg to your individual walking style. If there are no critical problems needing to be adjusted, it is important to spend an initial 10-15minutes getting used to how the new leg feels.
After this familiarisation period, a longer check walk is needed. During the check walk, your prosthetist will explain how the new components work, allowing you to better understand their function and get the most out of them. Adjustments can be made to fine tune your prosthesis further as your ability to use the new prosthesis improves.
The photo above demonstrates walking on the street (check walk), the final phase of dynamic alignment. During this phase the amputee imitates different walking situations in a controlled real-life environment. Your prosthetist will observe how you walk and corrects the alignment if required.
Conclusion
Alignment is a crucial process in prosthetic treatment. As we mentioned before, our body has to work to stay balanced when we stand and walk. Prosthetic alignment directly and dramatically affects on the amputees ability to balance and maintain an energy efficient gait. If you believe you may need your alignment adjusted, it is important you discuss your individual circumstances with your own prosthetist to ensure your prosthesis is in the best position.
In the next article we will look a bit closer at how alignment is found and adjusted as well as what deviations can be observed and corrected.


This is so nice. Please can I have a full download of this and more. I am a Prosthetist and orthotist.
Good explain.
j’ai aimé cet article
bonne continuation l’équipe 🙂
FROM I HAVE A HIP TYPE LEG FOR OVER 50 YEARS AND ALINGMENT IS VERY IMPORTMENT. I FIND YOUR INFORMATION VERY HELPFULL. I DO A LOT MY OWN ADJUSTMENT LIVE SO FOR FROM ANY OFFICE. THAN YOU.